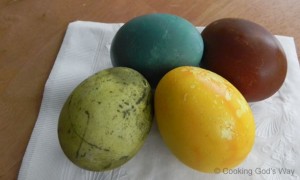
 We haven’t dyed Easter eggs in our house in years due to the health hazards of artificial colorings. Well to my children’s excitement I’ve done some searching and found a natural way to color eggs.
I am still playing with the colors and the end results. But overall the experiment turned out well.
You will need:
- 1 dozen, or more, “white-shelled” hard-boiled eggs
- filtered water
- distilled white vinegar
- red cabbage
- frozen blueberries
- ground turmeric
- can of beets
- any other spices, fruits/vegetables you would like to add to experiment with different colors
- enough stainless steel saucepans and/or bowls for the number of colors you are making
- room in your fridge to store these bowls overnight
- other items like measuring cups, spoons, paper towels, etc.
Tip: Have everything ready before starting so you’re not tripping over things (or little ones) in the kitchen trying to look for a utensil, etc.
The Process:
The process is fairly simple. All colors will use the same process, just different fruits, vegetables, and/or spices. If you prefer darker “brighter” colors just use more of the ingredient(s). IE, use a whole head of red cabbage for the blue instead of a half.
STEP 1: Make the Colors
DENIM BLUE: Chop 1/2 a head of red cabbage. Add to a sauce pan with 4 cups water and 1 Tbsp. salt. Bring to a boil then immediately add 2 Tbsp. of vinegar. Continue boiling for 15 minutes. Remove from heat.
SUNSHINE YELLOW: Add 2 Tbsp. ground turmeric to a sauce pan with 4 cups water and 1 Tbsp. salt. Bring to a boil then immediately add 2 Tbsp. of vinegar. Continue boiling for 15 minutes. Remove from heat.
DINOSAUR-EGG GREEN: Add 3 cups frozen blueberries + 1 1/2 Tbsp. of ground turmeric to a sauce pan with 4 cups water and 1 Tbsp. salt. Bring to a boil then immediately add 2 Tbsp. of vinegar. Continue boiling for 15 minutes. Remove from heat.
CHOCOLATE BROWN: Pour 1 can (15 oz.) beets with their liquid into a sauce pan with 1 cup water and 1 Tbsp. salt. Bring to a boil then immediately add 2 Tbsp. of vinegar. Continue boiling for 15 minutes. Remove from heat.
STEP 2: Dye the Eggs
After boiling, allow all mixtures to cool completely. Use a slotted spoon to strain out pieces of cabbage, blueberries, beets, etc. (There is no need to strain the turmeric/spice mixtures.)
Transfer liquid to stainless steel bowls, if desired. (I kept the liquid in the pans and didn’t bother to transfer to another bowl.)
Add in the desired number of hard-boiled eggs to each pan/bowl, making sure the eggs are covered completely with the liquid. If needed you can add a little extra water to cover.
Leave eggs in liquid as long as needed until desired color(s) are reached. For richer, deeper colors, place eggs covered in the “dye” in fridge overnight. Remove eggs and gently pat dry with paper towels. Lay on paper towels until thoroughly dry, turning as needed to allow air to circulate.
Once eggs have dried for an hour or two, you may notice the finish dulling – if this happens and you want to “brighten” them back up a bit – simply rub eggs with a little coconut or olive oil and buff lightly with a napkin. Note, some of the finish may rub off on the napkin – it is not usually noticeable on the egg.
Notes:
- The blue was supposed to be a deeper blue, next time I will use the whole head of cabbage.
- The yellow turned out very nicely, like a ray of sunshine.
- The green was supposed to a more brighter lively color. Though the kids are happy, as they think they look like dinosaur eggs.
- The brown was intended to be some form of pinky-purple-red. Next time I will try some red onion skins and/or chili powder. Got to work on this as my daughter’s favorite color is pink!
- Overall I am happy with the results of this first experiment and am looking forward to trying again to see what other colors I can come up with.
Here’s a link from Martha Stewart on how to achieve different colors. >> Dyeing Eggs Naturally


Thanks for the notes at the bottom!
I have been wondering if this would work. Thank you for giving it a try and testing the results. I would say your results were well-pleasing to the eye and very satisfactory [excellent!].